Wednesday 30 December 2015

Top 10 Blog Hop 2015


Hello and welcome to my stop on the Top Ten blog hop!

This has been such a memorable year for me with huge learning curves in all aspects of my life. Juggling work, motherhood and creativity can be a tricky thing sometimes! As this year draws to a close I want to share with you some of my favourite projects. I (naughtily) don't share as much as I should on my blog - choosing Instagram (@chantallemcdaniel) for a quick share instead, so it will be great to see them all in one place!

Scroll down for full details of the hop. There is an awesome prize to be won, so be sure to visit all the girls to maximise your chance of winning!

This first layout was one of the very first projects I created for Simple Stories. I was brand new to the team and so nervous for my debut. It was such an honour to be joining, I really didn't want to mess up, lol.


The centre band pulls out to reveal more photos and journalling, echoing the magic theme.


I created this clock for a dear friend as a birthday gift. I hope she wakes up every day to positive vibes!


This page I created at Escape2Create during the amazing Kim Price's class. It was such an eye opener and the whole trip, really moved me in an amazing way. An unforgettable experience, this page is a reminder of that.


This is a digital page I created for Kraft Plus Challenges. I really love this photo of my Son.

For full digital credits, click here.
During the making of this page, I felt an amazing connetion to my Mother. I can only hope I get that feeling again some day.


Is it wrong to just love something you made so much? Hehe. I want to swim in that ink!! Creating using Kim Price's technique.

Another created for Simple Stories. Summer Vibes is such a gorgeous collection and I had just got my Fuse Tool, which was super exciting.


I was totally inspired by a digital page that I saw in a gallery.


Definately one of my all-time favourites! This one was for a  Jot Magazine challenge.


One word for this... FUN! 


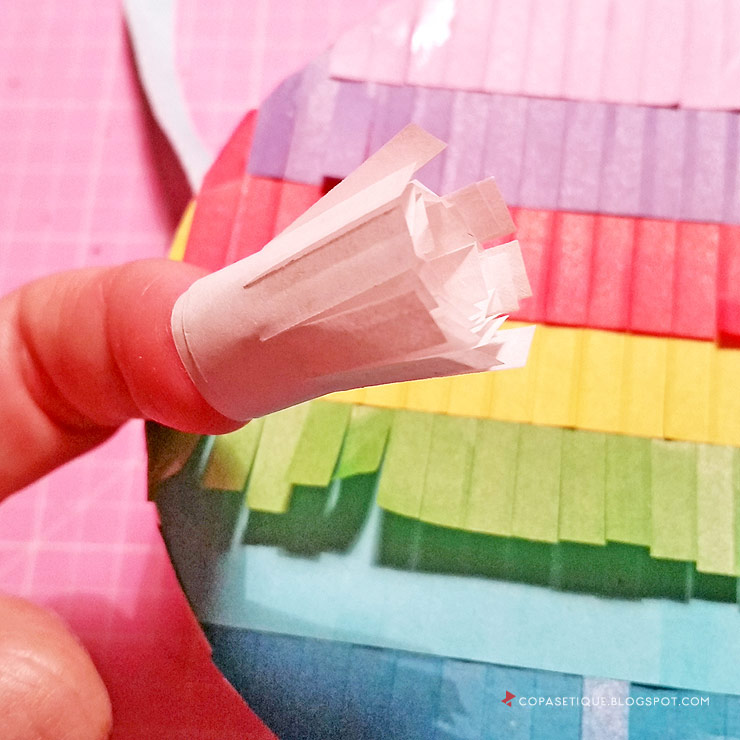
I was recently offered the opportunity to try out these super cute mini pinatas by WRMK. The drum and hand bags I created turned out pretty cute. You can click here to see the full post.


Ack, another cutie I couldn't resist putting in! My last DT project for Kraft Plus was a mini suitcase which opened to reveal four mini albums.


And finally, this Christmas countdown calendar. Such fun to make and even more fun for the kids to change up every day.


BLOG HOP INFO

Grand Prize: US$80 Gift Certificate to the online store of your choice. How awesome!
How to Enter: To be in the running for the prize, all you have to do is leave me a comment below INCLUDING your country please, so that I know you are joining in the fun. You can get one entry for commenting on each blog in the hop.  i.e: that's up to 24 entries (no more than one comment per blog will be counted). Entries will close at 11:59 pm CST on January 3. The winner will be drawn from all the comments on the 4th of January, so be sure to check back here then.

** I will also be giving away a Heidi Swapp Memory File album** 
This part of the giveaway is only open to residents of Australia unfortunately, due to postage costs.


If you're following the hop, you will be moving on to Becki's blog next!

Thanks for joining in the fun and good luck!

Tuesday 29 December 2015

Wanderlust Suitcase for Kraft Plus Challenges

There are a few days left to get your entries in for the December kraftboard over at Kraft Plus Challenges. This month there is a 'Wanderlust' theme with the criteria being:

Kraft + Travel + Maps 


I was completely inspired by the suitcase in the photos. There are so many places I would still like to visit! I found the cutest suitcase cut file in the Silhouette online store and created this travel case using Simple Stories 'Summer Vibes' and 'So Fancy. 


There is a little drawer which slides out to reveal four mini albums, one for each of the four holidays we took over the course of 2005...


Hello Amsterdam, Greece, Paris and South Africa!


The albums have been simply bound using a book ring. Each has about 6 pages, with a postcard at the end (old October Afternoon) where I can jot down my memories. To save you trying to decipher my scrawl, I hadn't written on them for the photos, hehe.


The inside of the Amsterdam one. My printer was running out of ink by this stage, so the photos are a little washed out, unfortunately.


Greece:


South Africa. How I miss that beautiful mountain!


All pretty simply embellished, but so cute together.

Thank you so much for stopping by today. Sadly, this will be my last DT project on the K+ team. I have loved the clever challenges Sandra has put together for all of us kraft lovers and can't wait to see what amazing creations will be coming out of the K+ group next year!

I hope you will get a chance to play along if you haven't already.

Take care,


Monday 14 December 2015

We R Memory Keepers DIY Piñatas


So a few weeks ago I was completely thrilled to be invited to test out a new WRMK product for their DIY Party range. When I opened my box to find the cutest mini piñatas you could imagine, along with fringe tape and confetti, my mind started to buzz with ideas!


Just check out these stunning colours... A rainbow of goodness with lush metallics to boot!


I was lucky enough to receive the mini circles which are a great versatile shape to work with.


Having two gorgeous girls around, I settled on some very sweet party handbags. A suspension of sorts, hehe, I thought they would be a fun idea to have at a party, as the kids could enjoy discovering sweet treats inside and then use them again for dress up fun at home!


The handbags were a hit!


Despite their small stature, these little piñatas actually fit quite a bit inside! The confetti (available in rainbow brights and beautiful gold & silver metallics) added even more fun to the colourful hidden surprise!


Let me show you how I went about creating the bags

The piñatas themselves come plain for you to decorate yourself. They are made from a sturdy card which is uncoated on the outside and coated on the inside for a nice finish. I traced around a circle onto some pink cardstock, which I then cut out and adhered to the one side. This will be the 'back' of the bag, which will be against the child's body.


I measured a length of ribbon for the strap of the bag and then adhered one end to opposite sides of the circle using Helmar 450 glue. The reason I put the strap on now is so that it will have a neat finish once I applied the fringe tape over the top.


The paper fringe tape comes ready-to-use with double sided tape. Simple remove the paper backing and you're ready to go! Each pack comes with enough tape to wrap one piñata.


To keep a bit of the traditional piñata style, I've layered up some colours, using 'Blossom' and 'Twilight'. Another nice feature of these tapes is that most of them (excl. white, black and metallics) come with two tones of the same colour in a pack, so you can create visual interest with only one pack if you like.


In order for my little bags to be opened and closed, I have used some magnetic tape and popped some on the flap and on the opening of the circle. This is an easy method that doesn't require fiddly fastners for little hands. FYI: See those little holes? They are so you can hang your piñata from the ceiling or add some balloons.


For the outer edge of this bag, I have used gold metallic tape cut to short lengths and layered. TIP: It is easier to add tape over the top of each other than it is to try and tuck underneath the above piece, IYKWIM!


This purple and pink bag has a decorative heart on the front which I created very easily using a simple shape cut from plain white card.

I applied a liberal amount of adhesive over the top and sprinkled a mixture of the colourful and metallic confetti on top. I applied a few more individual confetti bits so it had a even mix and finished it off with a couple of WRMK adhesive sequins and some tiny rhinestones.


As a final flourish, I've run some white fringe tape around the circumference of the heart and then popped it on to some foam tape so it would stand out a bit against the background. So sweet.


The other bag I made using the same method, but this one has a cute floral theme on the front. To make some leaves, I stuck two bits of tape together, fringe facing outwards.


I then snipped around, creating a leaf shape. You'll notice I've left a bit of the middle tape part for the bottom of the leaf.


To create the flower petals, I've rolled some white tape around my finger...


and then pulled the 'petals' open...


Pop an oversize rhinestone, button or brad in middle and you've got a flower!


 The girls couldn't wait to see what was inside their special bags.


Now for those of you who have special little boys in your life, I also have one more idea for you... how about creating your own teeny drum sets?


Baby K was delighted to bang on his piñata drum!


 Cute treasures for cute bubs waiting inside...


For the striped pattern on the side, I first layered light blue tape from a pack of 'Sky' so that the taped part was roughly in the centre....


I then took two strips of the darker blue and taped them, fringe facing out, on either side leaving the light blue in the middle.


The fringe tape had covered the holes, but I poked two more so I could run a bit of cord through them which was attached to my drumsticks.


Look at his little face as he discovers the hidden treats!


Thank you WRMK for allowing me to have such fun with these super cute piñatas!

** Check out the We R Memory Keepers blog here to find out more about these adorable Piñatas PLUS enter the giveaway to WIN some of your own! Winner will be drawn tomorrow.

Thank you so much for stopping by!